How To Use And Read A Multimeter (Ohms, Voltage, Current)
What is a Multimeter?
A multimeter, also known as a multitester or VOM (Volt-Ohm-Milliammeter), is an electronic measuring instrument used to measure various electrical parameters.
Multitesters are a standard diagnostic tool for technicians and electricians in the electrical & electronic industries (see the full list of electricians tools).
A typical multimeter can measure voltage, current, and resistance. The best multimeters can also measure other electrical characteristics such as continuity, frequency
Multimeters are classified as either digital multimeters or analog multimeters, depending on how the electrical characteristic is being read and displayed.
Multimeters can either be handheld multimeters, or bench-top multimeters (bench multimeters). You can get handheld and bench multimeters in both digital or analog form.
How to Read a Multimeter
When reading a multimeter, every multimeter has these four main settings:
Display: This is where you can see the measurements
Ports: Plug-in probes (i.e. to test car batteries)
Probes: Multimeters have two probes. Usually one is black and one is red.
Selection knob: This tells you what you want to measure.
To read and measure the ohms resistance using a multimeter:
Clip the test leads on the resistor leads
Dial the multimeter to the estimated resistance range
Read the value
If your multimeter gives you a 1, then you’ve guessed low for a value. Move the multimeter’s dial upward until it gives you a valid reading.
However, if it gives you a 0, then you’ve guessed too high. Move the dial downward until you get a valid reading. If you’re on the lowest range and still have a 0, whatever circuit you’re testing has a resistance too low for your multimeter to measure.
Note that this is only necessary if you do not have an autoranging multimeter. If you have an autoranging multimeter – it will do all this for you. Simple attach the test leads to the DUT (Device Under Test) and read the voltage/current/resistance from the screen.
Multimeter Symbols
The following is an explanation of the most common multimeter symbols.
The various multimeter symbols include:
Hold
Shift: Hertz
Ohms
Diode Test
DC Voltage
AC Voltage
Hold
Placed on the top left corner on most multimeters, this button locks the measurement into place after you’ve taken it.null
Shift: Hertz
It tells you the equipment’s or circuit’s frequency. This is usually placed above the AC voltage option.
Ohms
The Ohms symbol is an upper case Omega letter. This is used to find the resistance reading.
Diode Test
This has a right arrow with a plus sign next to it. As you could have guessed, this tells you if you’re working with good or bad diodes.
DC Voltage
This symbol has a V and three hyphens above it and one straight line above it.
AC Voltage
The AC voltage symbol looks like an A with “a road” placed on top of it. It has an A with three dashes and a straight line above it.
Parts of a Multitester
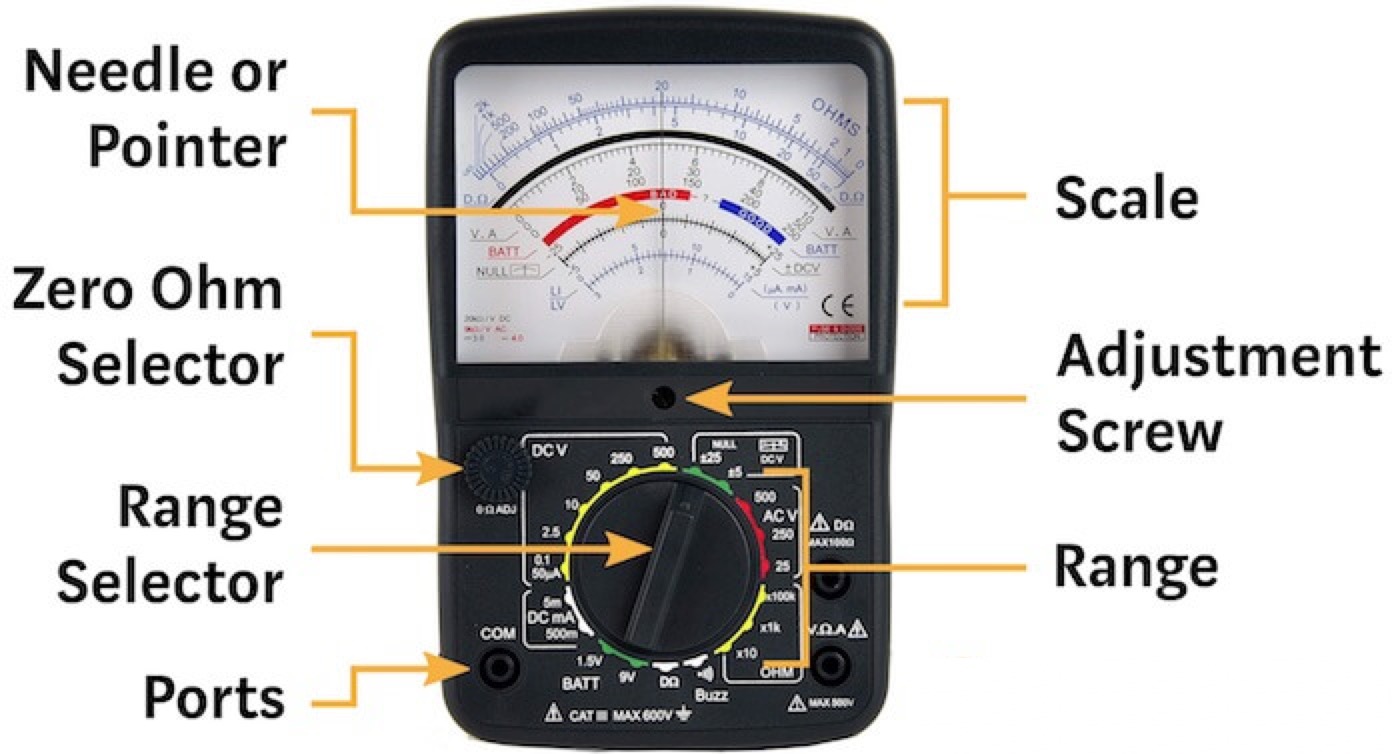
The parts of a multitester are:
A Scale
A Needle or Pointer
An Adjustment Screw
A Zero Ohm Selector
A Range Selector Knob
Ports
Test Probes
Scale
This is how you read the value being measured.
For an analog multitester, this is a series of markings in a semicircle.
In the example above, voltage, current, and resistance can be displayed. Which value you are measuring depends on what port you plugged into on your analog multitester.
Needle Pointer
This is the needle-shaped rod that moves over the scale of a meter.
The needle pointer is mechanically connected to the moving coil. The value the pointer hovers over indicates the value being measured by the multitester.
Note that when there are multiple values being measured on the same scale, you’ll need to pay attention to which port the multitester is connected to. Match the port up with the value being measured.
Adjustment Screw
Also known as the dial or infinity knob. This allows you to adjust the pointer to the zero position of the scale – usually with the help of a flat head screwdriver (check out our best electricians screwdriver sets if you’re looking for a good set).
Fun fact: the name ‘infinity knob’ comes from the fact that at 0 voltage, you have ‘infinite resistance’ (as per Ohm’s law. Note that an easy way to learn Ohm’s law is through looking at Ohms law wheel).
Zero-Ohm Adjustment Knob
The zero-ohm adjustment knob is used to calibrate the multitester when you want to measure the resistance of an object.
To make sure the multitester is calibrated correctly:
Turn on the multitester
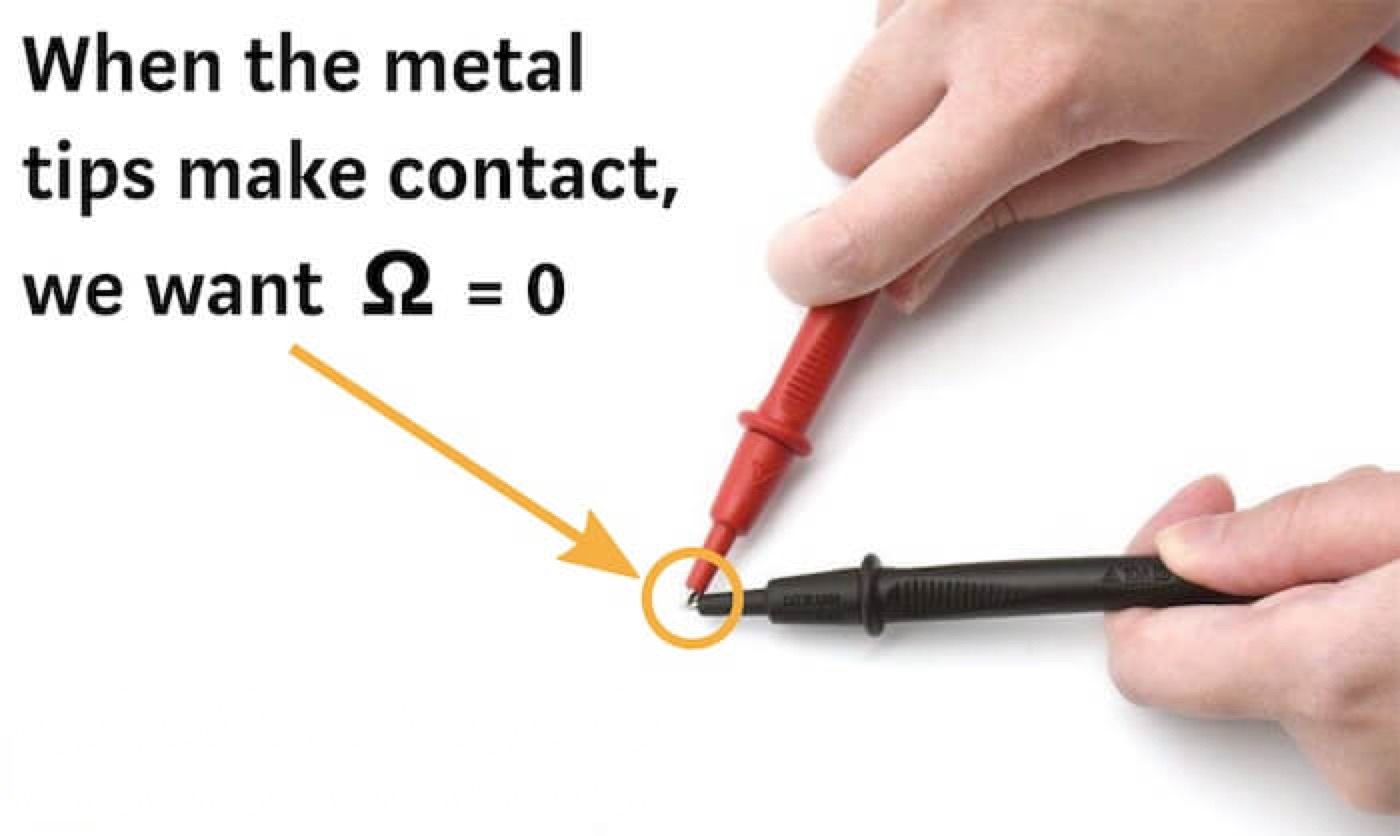
Connect the metal tips of the two probes.
Use the zero-ohm adjustment knob to adjust the needle to point to ‘0 ohms’ on the scale
And that’s it! Since you’re not putting anything between the two metal tips, you would expect the multitester to read a resistance value of zero. If that’s not the case – then you need to use the zero-ohm adjustment knob to calibrate the multitester to… zero ohms!
Range Selector Knob
Also known as a selector switch. This allows you to adjust the settings of the multitester (range selector knobs are also present on the best insulation resistance testers).
Using this you can change what the multitester is measuring (e.g. voltage, current, or resistance), as well as the range of the measurement (e.g. volts or millivolts).
The range selector knob can be auto ranging, or manual ranging.
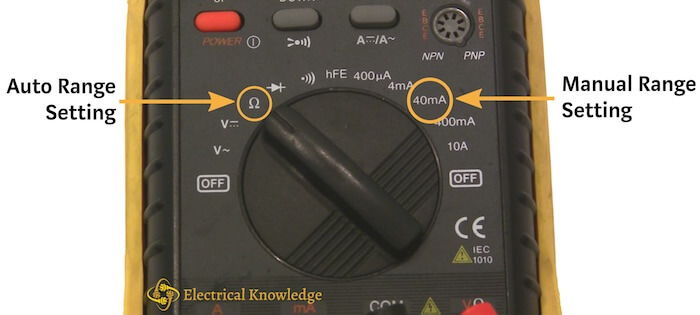
Auto ranging is much easier to work with. You simply adjust the dial to the symbol corresponding the the electrical parameter you want to measure. You connect the test probes and like magic – you have your measurement.
Manual ranging on the other hand is a little bit trickier. With manual ranging, you need adjust the dial so that the value its set to is higher than the maximum value you expect from your circuit.
Let’s run through an example. In the image above, the multitester measures current using a manual range setting. The setting values are:
400 µA
4 mA
40 mA
400 mA
10 A
So lets say I have a circuit where I expect the maximum current to be 300 mA. I now need to select the manual setting which is higher than my expected maximum current. Hence I should adjust the range selector switch to the 400 mA setting.
In another circuit where I expect a maximum current of 6 A, I would adjust the selector switch to the 10 A setting. Here the 400 mA setting would be too low, as 400 mA < 6 A (remembering that 6 A = 6000 mA).
Ports
The holes at the front of the multitester are known as ports. You need you plug your test probes into the appropriate ports to allow the multitester to measure the parameter that you’re interested in.
Test Probes
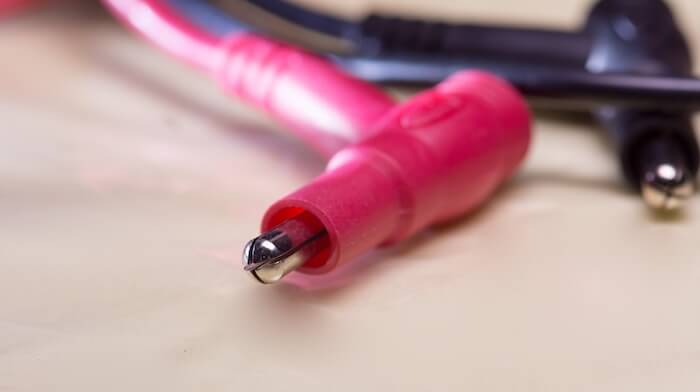
A test probe (or test lead) is an instrument used to connect a multitester to a Device Under Test (DUT).
Test probes are flexible, insulated wires. They are able to establish an electrical connection between a multitester and the DUT without exposing electrical workers to live conductive parts.
Red test probes connect to the positive terminal, and black test probes connect to the negative terminal.
The best multimeter test leads are well insulated, strong, and low cost – while bad test probes can be expensive and fragile.
For a simple handheld multitester, the strong low-cost test leads are usually sufficient.
Types of Probes
The types of probes include:
Banana plug to Simple Test Probes
Banana plug to Alligator Clips
Banana plug to IC Hook
Banana plug to Tweezers
Multitesters connect to a test probe through a ‘banana connector’ – like most pieces of electrical test equipment.
Test leads are flexible, insulated wires, which act as the conductor from the multimeter to the item being tested.
Each test probe will have a ‘banana plug’ (male connector) on the end of each wire. These banana plugs connect to the multitester’s ‘banana jack’ (female connector).
You can have any type of connector you want on the other end of the test probe – only one end has to be a banana plug.
There are many different types of test probes available for multitesters. Below are a few of the most common.
Banana Plug to Simple Test Probes
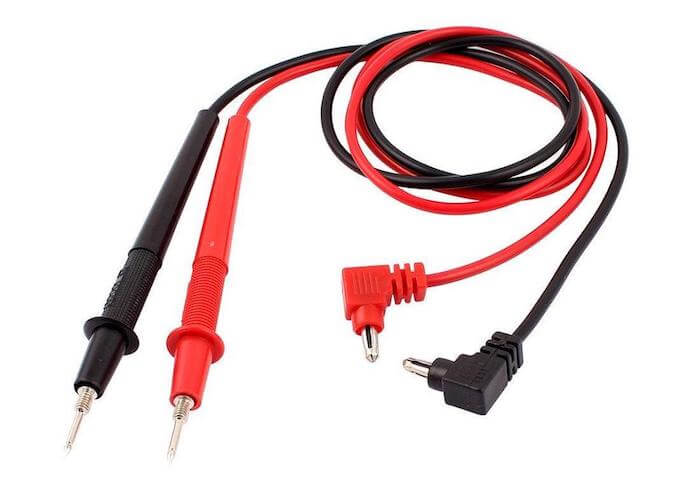
These are your standard test probes that come with most multimeters.
The probes have a plastic handle near the end of the wire. This allows you to safely hold and guide the probe to your test point without affecting the measurement.
The end of the wire is connected to a pointed metal tip. This is the part of the probe that makes contact with the DUT.
These test probes are robust and low cost. The biggest downside is that they are not hands-free – they require someone to be holding the test probes.
Banana Plug to Alligator Clips
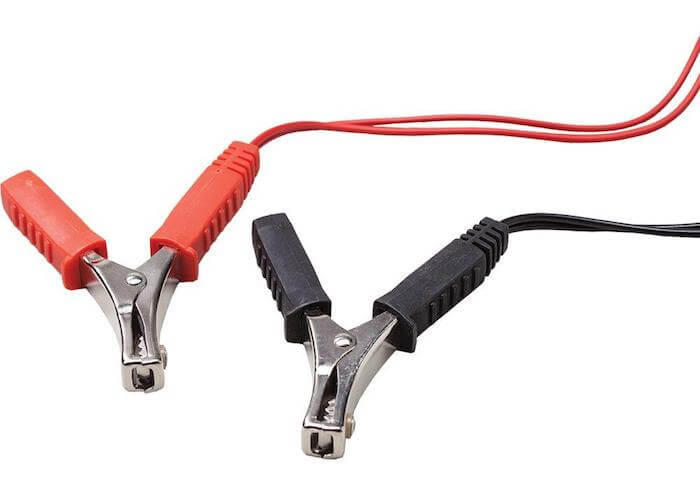
Alligator clips are arguably your most versatile test probe as they are able to connect to a wide range of objects.
Alligator clips are great for connecting to thick wires or pins on a breadboard. These can connect to almost anything. When push comes to shove, you can use a good set of electricians pliers to flatten the electrical connection into a suitable contact for your alligator clips.
Unlike the simple test probes, these are hands-free.
Banana Plug to IC Hooks
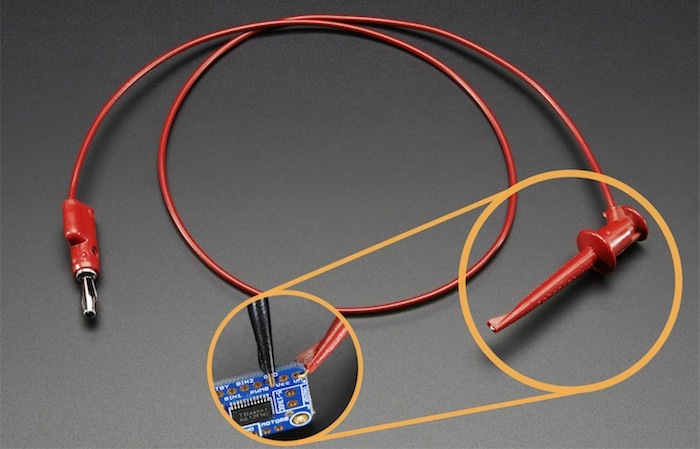
IC (Integrated Circuit) hooks grab onto wires, pins and leads of electronic parts.
Similar to alligator clips, IC hooks will stay attached to the piece of equipment you’re testing, allowing for hands-free operation.
IC hooks are less slightly convenient than alligator clips as they can not be added and removed quite as easily.
The advantage of an IC hook is a stronger connection to the DUT. They work best when connected to smaller ICs or legs of ICs.
Banana Plug to Tweezers
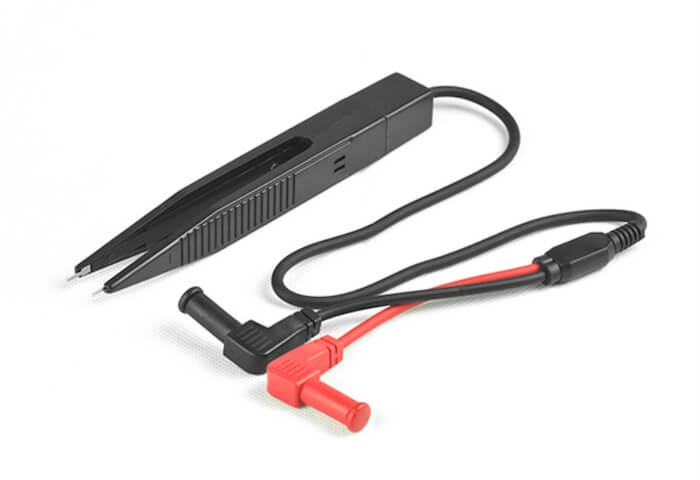
Tweezer test probes are generally more fragile and expensive than the other test probes mentioned above, but can still be useful in certain scenarios.
Tweezer test probes are used when working with very small DUT. In particular, they are ideal for working with Surface Mounted Devices (SMDs) – i.e. components that are mounted directly onto the surface of a Printed Circuit Board (PCB).
Types of Multimeters
A typical multimeter (or multitester) can measure voltage, current, and resistance. When used in this way, a multimeter is known as:
A voltmeter when used to measure voltage
An ammeter when used to measure current
An ohmmeter when used to measure resistance
More advanced (and expensive) multimeters can also measure other electrical characteristics, including:
Capacitance (measured in farads)
Conductance (measured in siemens)
Duty cycle (measured as a percentage)
Frequency (measured in hertz)
Inductance (measured in henries)
Temperature (measured in degrees Celsius or Fahrenheit. Note that an accompanying temperature test probe is needed – usually a thermocouple)
Multitesters are classified as analog or digital depending on how they interpret and display the electronic characteristic being measuring.
Multimeters come in two forms: handheld multimeters, and benchtop/bench multimeters. As multimeters are often carried around, handheld multimeters are more popular than bench multimeters.
Analog Multimeter
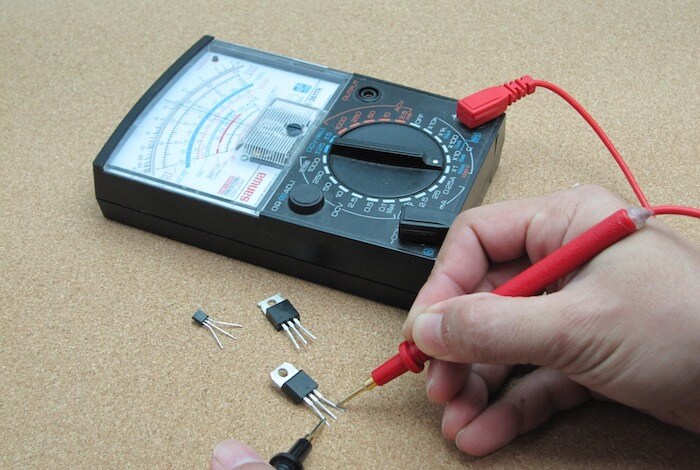
Also known as an analog multitester or AMM. Analog multitesters typically use a galvanometer to display a voltage, current, or resistance reading. Some analog multitesters also use bar graphs, LCD or vacuum fluorescent displays.
Analog multitesters are the ‘old school’ multitester design. While they look cool, they are generally outclassed by digital multimeters.
This is because analog multitesters:
Are harder to read (hence yielding a less accurate reading)
Are easier to break (less robust)
Suffer from parallax errors
A parallax error is a perceived difference in the position of an object when viewed from two different lines of sight.
This occurs when viewing an analog multitester from the side. For example when viewed from the left hand side, it will look like the analog multimeter is measuring a larger value than it actually is.
To avoid this issue, measurements from analog multimeters should only be read when directly facing the multimeter.
Digital Multimeter (DMM or DVOM)
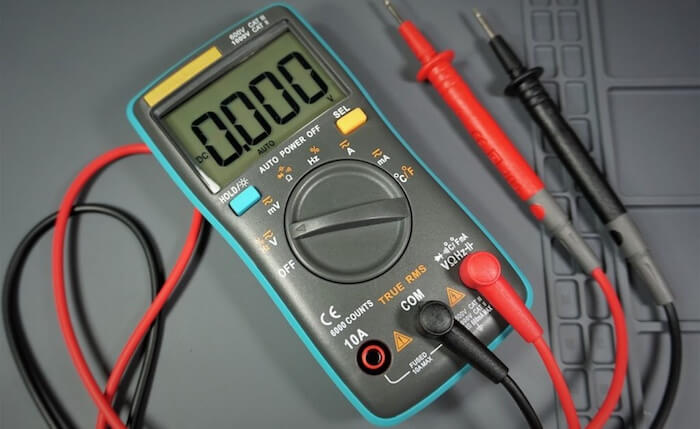
Also known as a digital multitester, DMM (Digital MultiMeter) or DVOM (Digital Volt-Ohm Meter).
In a digital multimeter – such as a Fluke 87V digital multimeter – the original signal is sampled, buffered, and averaged to display the measured voltage. An amplifier with electronically controlled gain preconditions the signal.
A digital multimeter displays the quantity measured as a number. This eliminates the measurement inaccuracies caused by parallax errors, and general human error from misinterpreting the exact position of the needle pointer.
Digital multimeters are superior to analog multimeters because:
They are easier to read (less chance of misreporting values)
They are more robust (less moving parts)
You don’t need to fiddle with a zero-adjustment knob
You can fix your readings to the screen
Many digital multimeters come with auto-ranging (meaning you don’t need to know in advanced whether the circuit is AC or DC)
What is a True RMS Multimeter
A True RMS (Root Mean Square) multimeter is a type of multimeter that is able to accurately measure both sinusoidal and non-sinusoidal AC waveforms.
Other types of multimeters – such as an Average Responding Multimeter or Oscilloscope – are only able to measure sinusoidal AC waveforms.
There are two types of AC waveforms:
Sinusoidal (sine) waves: Symmetrical transitions between circular peaks and valleys, without distortion. Sometimes known as Pure AC Waveforms.
Non-sinusoidal waves: Waves that have irregular patterns such as pulse trains, square waves, sawtooth waves, angular waves, and spikes. Effectively any wave that is not a sinusoidal wave.

There has been a huge increase in non-sinusoidal waves in electrical and electronic circuits, for example:
Computers
Variable-speed motor drives
HVAC devices (Heating, Ventilation, and Air Conditioning)
Solid-state environments
Electronic ballasts
Unlike the smooth sine wave produced by a standard induction motor, these devices produce unsymmetrical AC waveforms. A true rms multimeter is needed in these instances to ensure the voltage and current measurements are accurate.
You can learn more about the technical details of true rms detectors in this pdf and this textbook.
How to Test a Car Battery with a Multimeter
Want to know how to use your multimeter to test the voltage of your car battery, then the following procedure:
Step 1: Set Up The Multimeter
Stop your vehicle and make sure that the radio, lights, and ignition are off. Select the correct DC voltage position on the multimeter (Alternative: the 12 V setting if there’s a dedicated car battery testing range).
The DC voltage is indicated with a V and a short line and a dotted line underneath it. The AC voltage is used to check the main voltage of your home and has a wavy line after a V.
Once you’ve tested the battery’s connectivity, then it’s on to step 2.
Step 2: Read the Meter
Now that the battery is connected look at the multimeter to determine if it needs to be recharged. The multimeter will display the reading in volts, showing its charge quality (i.e. 12.0 volts = 25% charge).
Look at the following table:
Voltage Rating |
Charge Quality |
12.6 Volts |
Fully Charged |
12.4 Volts |
75% Charge |
12.2 Volts |
50% Charge |
12.0 Volts |
25% |
11.9 Volts and below |
0% |
Step 3: Check The Results
Anything that’s below 75% or at 12.45V is a sign that your battery needs to be recharged. However, it doesn’t tell you the quality of the battery. If the battery is unable to hold a charge after recharging, chances are you have a dead battery.
Step 4: Recharge Your Battery
If your car battery is below 12.45V, recharge it. After it’s been recharged, perform the previous steps to see if your battery is at the 12.65 range. If not, then you should get it checked out before seeking a replacement.
Who Invented the Multimeter?
Before multimeters were invented, finding the right measurement was a huge problem. You’d need one tool to find out the amps, and another one to measure the ohms.
This was extremely time consuming – so much so that it drove people to seek better solutions.
Donald Macadie is the inventor of the world’s first multimeter. Macadie became dissatisfied with the need of carrying separate instruments for telecommunication circuits. So, Macadie created a multimeter that could measure volts, amperes (amps), and ohms.
The first multimeter was named the Avometer. The meter had precision resistors, a voltage meter, and a coil meter, as well as sockets and switches to select the range.
Statement: Respect the original, good articles worth sharing, if there is infringement please contact delete.
Blake is an electrical engineering leader with 20+ years of expertise in imaging technology innovation. Former CTO of a global scientific camera manufacturer, he now drives strategic R&D and CCD-to-CMOS transitions at Jingtu Optoelectronics. His career combines technical excellence in precision instrumentation with cross-disciplinary team leadership across global markets.


