Eddy Current Testing

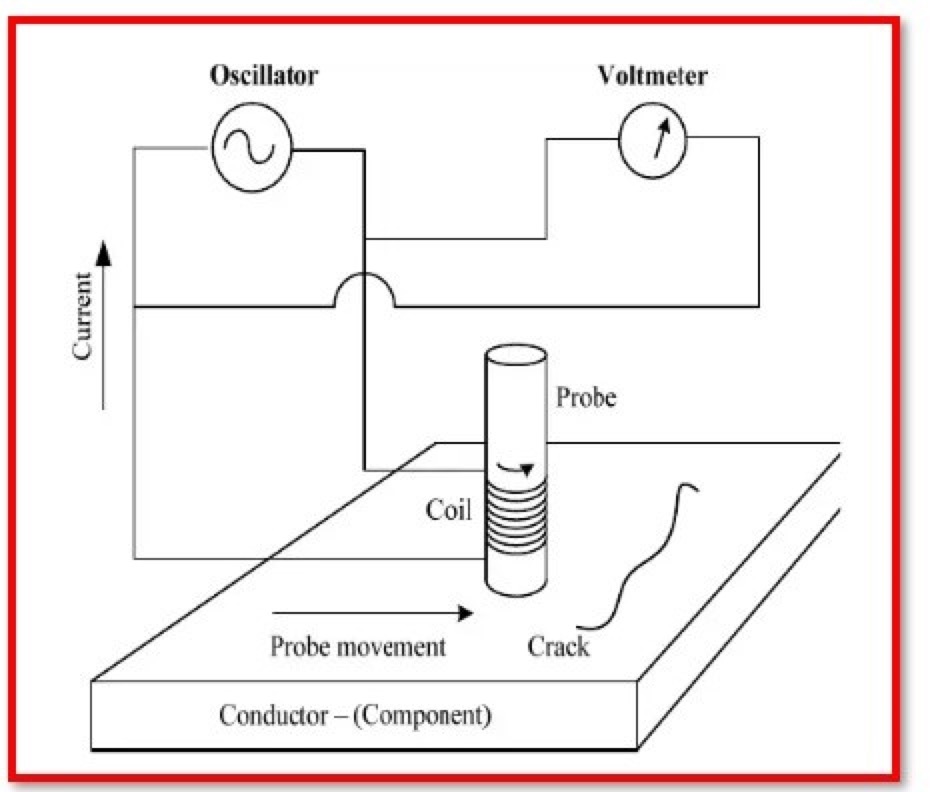
A non-destructive test technique that may be used on conductive materials is eddy current testing. Adjacent to the test surface is a test coil that is powered by alternating current.
Eddy currents are created in the test piece as a result of the alternating magnetic field which is produced. The test coil changes in a quantifiable way as a result of variances in eddy current flow. These modifications can be observed on a screen & analysed to find flaws.
By keeping track of variations in impedance of the eddy current test coil, it is possible to identify whether the test specimen has faults.
Coil impedance variations are represented by voltage variations with respect to signal amplitude & phase. Phase angle &/or signal amplitude fluctuations are connected to defect circumstances like volumetric and percent loss.
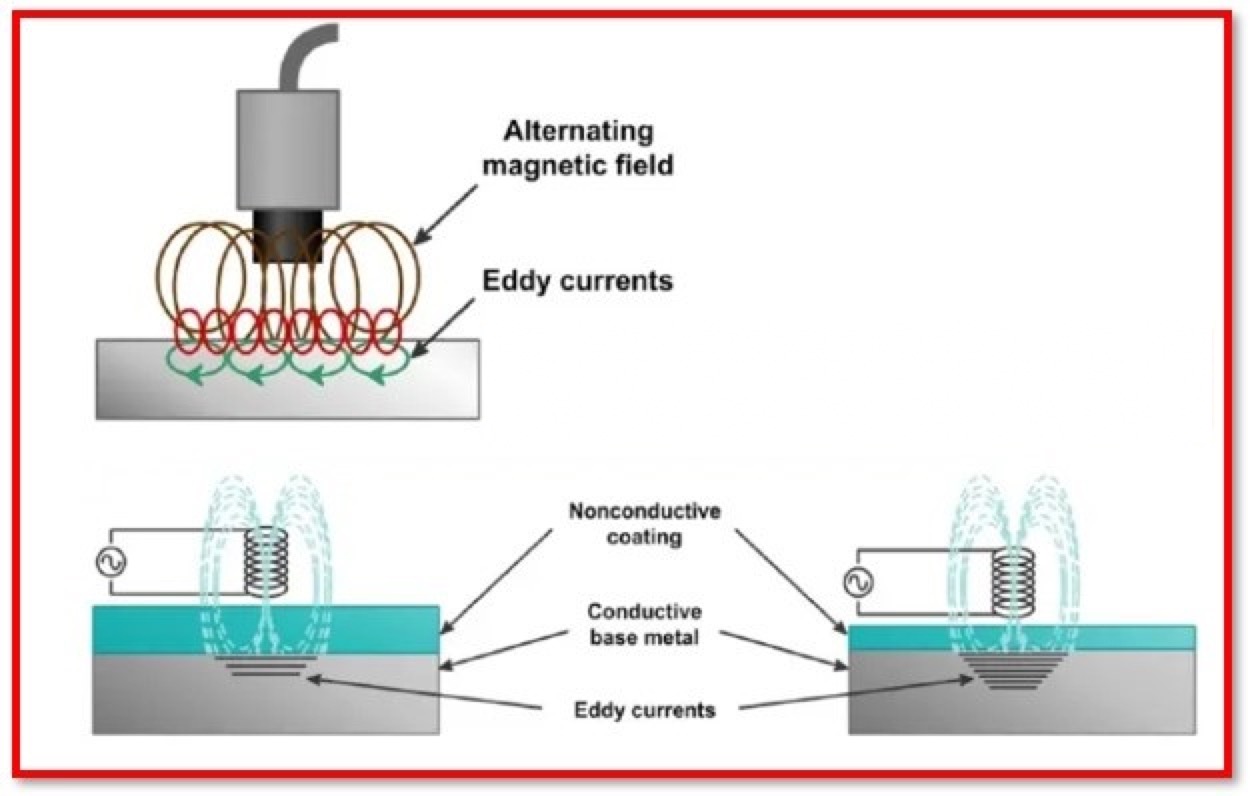
The test part’s conductivity and the thickness of any coatings applied to the conductive materials may also be determined using the eddy current inspection technique in addition to detecting degradation.
How does the eddy current function?
When an energised A/C coil gets close to a conductor, eddy currents are created by an alternating magnetic field.
By monitoring the impedance changes that take place in the A/C coil, it is possible to identify when a material defect affects the flow of currents. Finding flaws in the condenser tube and heat exchanger may be done in a highly effective non-destructive way using this testing procedure.
What does Eddy Current Testing mean?
One of the non-destructive testing techniques that leverage the electromagnetism principle to find flaws in conductive materials is eddy current testing. In close contact to the test surface, a specially made coil powered by an alternating current is inserted, creating a fluctuating magnetic field those interactions with the test component and causes eddy currents in the area.
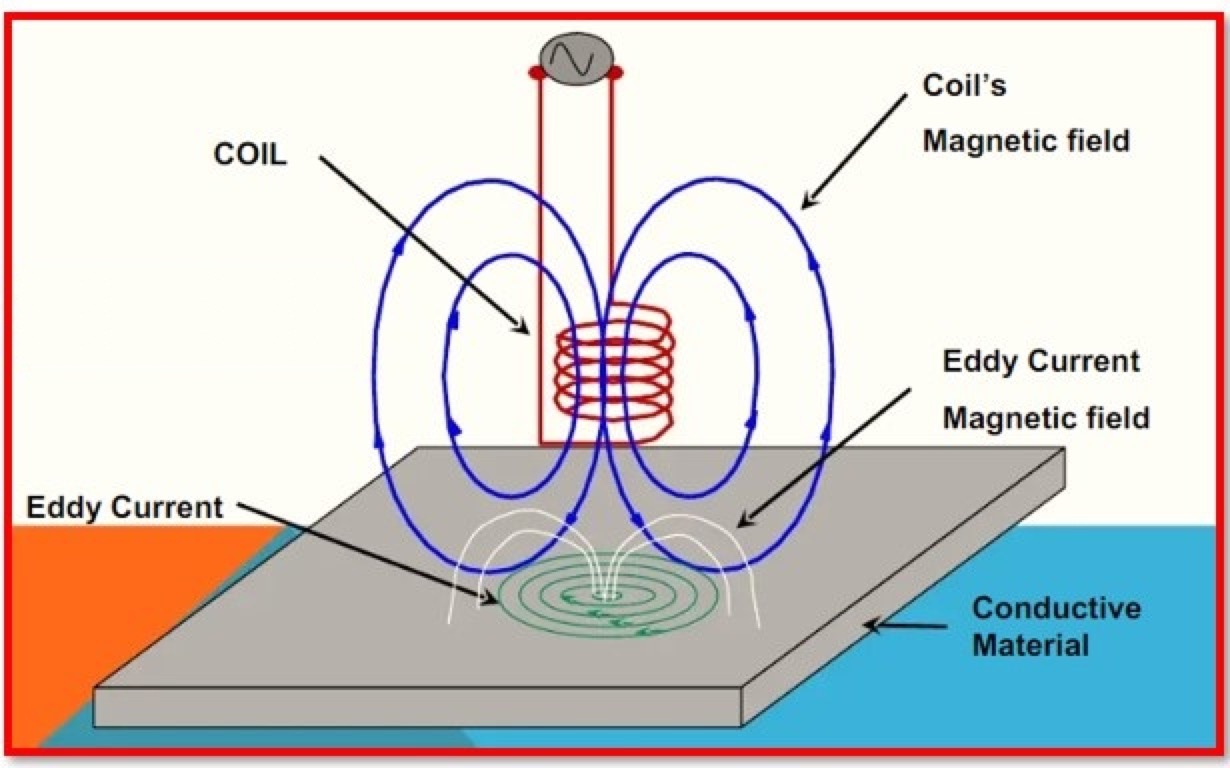
Then, changes to the alternative current flowing in the main excitation-coil are measured, together with variances in the changing phases & amplitude of these eddy currents.
Variations in electrical conductivity, the test-part’s magnetic permeability, or the existence of any discontinuities will affect the eddy current, which will vary the measured current’s phases and amplitude in turn. Defects are found by interpreting the changes as they are indicated on a screen.
How do Eddy Current tests work?
The method is dependent on electromagnetic induction, a characteristic of the material. A copper tube’s alternating current creates a magnetic field. As the alternating current goes increases and decreases, the size of the field changes. The changing magnetic field around the coil penetrates the material and, by Lenz’s Law, produces an eddy current to flow in the conductor if the coil is subsequently placed near to another electrical conductor. This eddy current, in turn, generates its very own magnetic field all on its own.The current & voltage flowing in the coil are impacted by this “secondary” magnetic field, which is in opposition to the “primary” magnetic field.
Any changes in material conductivity, such as near-surface defects or thickness, may affect the magnitude of the eddy current. The basic principle of the eddy current testing inspection perform is the detection of this change using either the primary coil (or) the secondary detector coil.
A material’s permeability determines how easily it may be magnetised. When the permeability of the medium rises, the depth of the penetration decreases. Ferritic steels have the magnetic permeability that is hundreds of times higher than non-magnetic metals like
Austenitic stainless steels,
Aluminium, and
Copper.
As depth increases eddy current density and defect sensitivity decrease.The “permeability” and “conductivity” of the metal both have an effect on how rapidly the value drops. Penetration is influenced by conductivity. Metals with a high conductivity have a larger flow of eddy current at the surface, whereas metals with a lower conductivity, such as copper and aluminium, have less penetration.
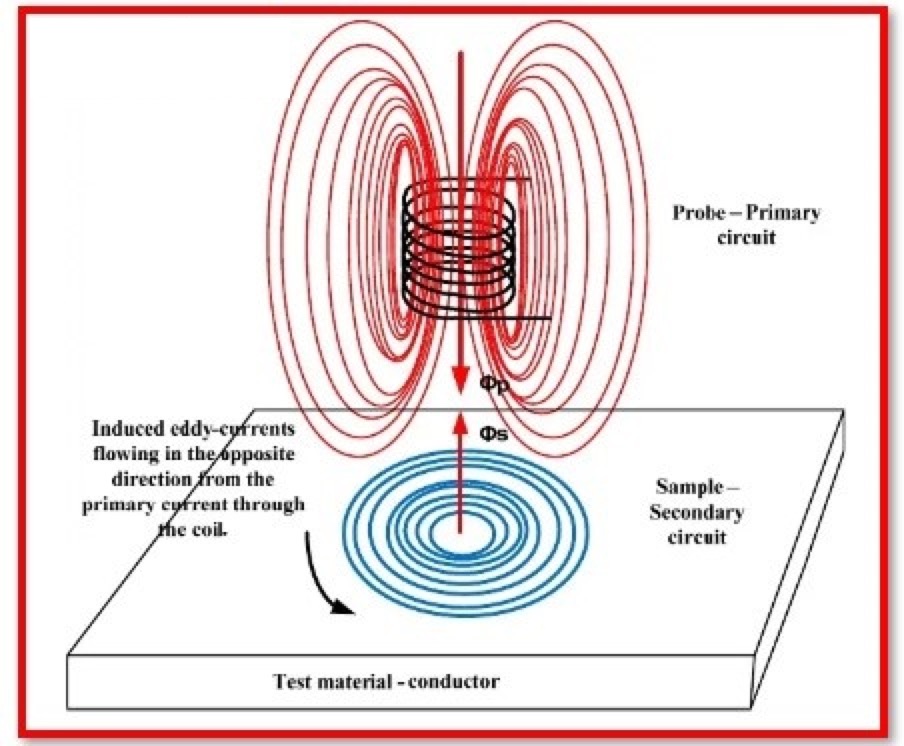
The alternating current’s frequency may be changed to control the depth of penetration; the lower the frequency, the deeper the penetration. Thus, low frequencies identify sub-surface faults and high frequencies near-surface faults. But the flaw detection sensitivity decreases when the frequency is dropped to provide better penetration. Therefore, there is an ideal frequency for each test to provide the necessary depth of penetration & sensitivity.
What is the term “eddy current tube inspection”?
Eddy current testing is often used for inspecting the tubing in
Heat exchangers &
Condensers.
This is a frequent use for the technique.
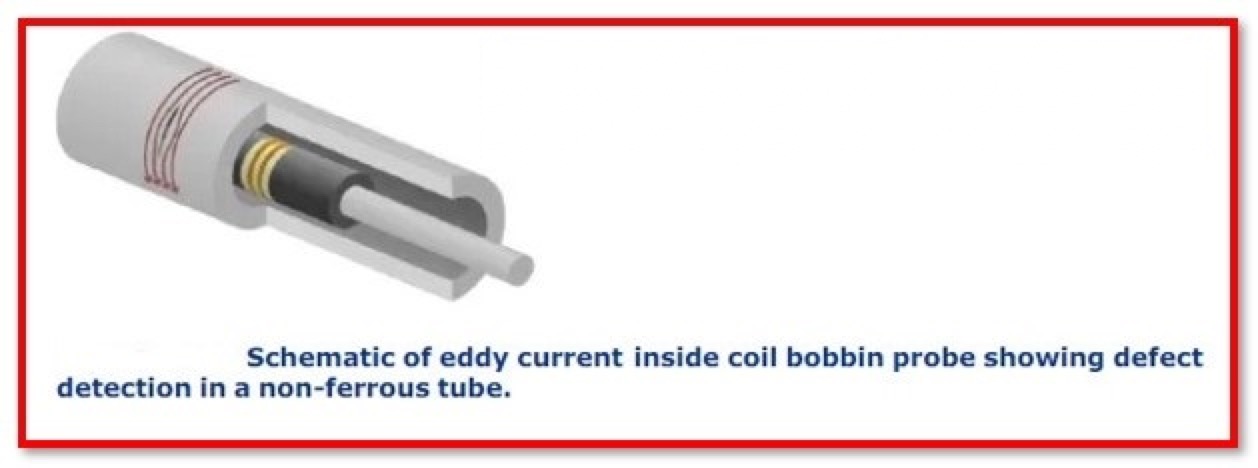
Testing using eddy current makes use of electromagnetic induction so that flaws in the tubing may be located. A probe is introduced into the tube, and it is moved along its whole as it moves through the tube. Eddy currents are produced by the electromagnetic coils included inside the probe, and their presence may be concurrently detected by measuring the electrical impedance of the probe.
Eddy current tube inspection is the non-destructive technique for identifying faults in tubing. It is effective on a variety of different tubing materials, and it may uncover abnormalities that have the potential to cause significant problems for heat exchangers and condensers.
What are different types of Non-Destructive Testing (NDT)?
Visual testing,
Liquid penetrant examination,
Ultrasonic testing,
Magnetic flux leakage, and
Magnetic particle testing
are additional NDT techniques.
The eddy current test technique may be used to identify a variety of tube flaws, including:
Erosion of the outer-diameter (OD) and Inner-diameter (ID)
ID and OD pitting
Wear (from the support structures, & loose sections)
Cracking
Standard and Calibration of the Eddy Current Testing
As with any other non-destructive testing (NDT) technique, eddy current testing requires that all systems be calibrated against suitable reference standards. The calibration blocks should be identical to the object being tested in terms of
Material,
Heat treatment condition,
Form, and
Size.
The calibration block has misleading faults that replicate imperfections for defect identification, and it has varying thicknesses for corrosion detection. The eddy current testing method requires a trained professional operator.
Which type of material is tested using an Eddy Current?
Any conductive
Non-magnetic
Weakly ferromagnetic substance
may be properly tested using eddy current technology.
This would apply to substances like
Ferritic chromium-molybdenum stainless steel and
Nickel alloys.
What kind of inspections may be carried out utilising eddy currents?
Among the eddy current testing methods include, but not limited to:
Heat exchanger tubing was tested using eddy current.
Checking the strength of the bolts and welds.
Conducting a conductivity test to examine heat-treated materials.
Checking for flaws in metal surfaces.
Identifying the presence of corrosion in the metal.
Because the findings are rapid and don’t need to touch the real metal, this is highly helpful for examining the structural integrity of buildings composed of conductive materials like copper, steel, and aluminium. These testing methods may be used to confirm that conductive materials, such as pipes, are not rusted, pitted, or fractured. They may be used to gauge metal hardness and the thickness of non-conductive coatings like paint. Eddy current testing is often performed, for example, to ensure that the heat exchanger tubing is not deteriorated.
Common Eddy Current Probe Types
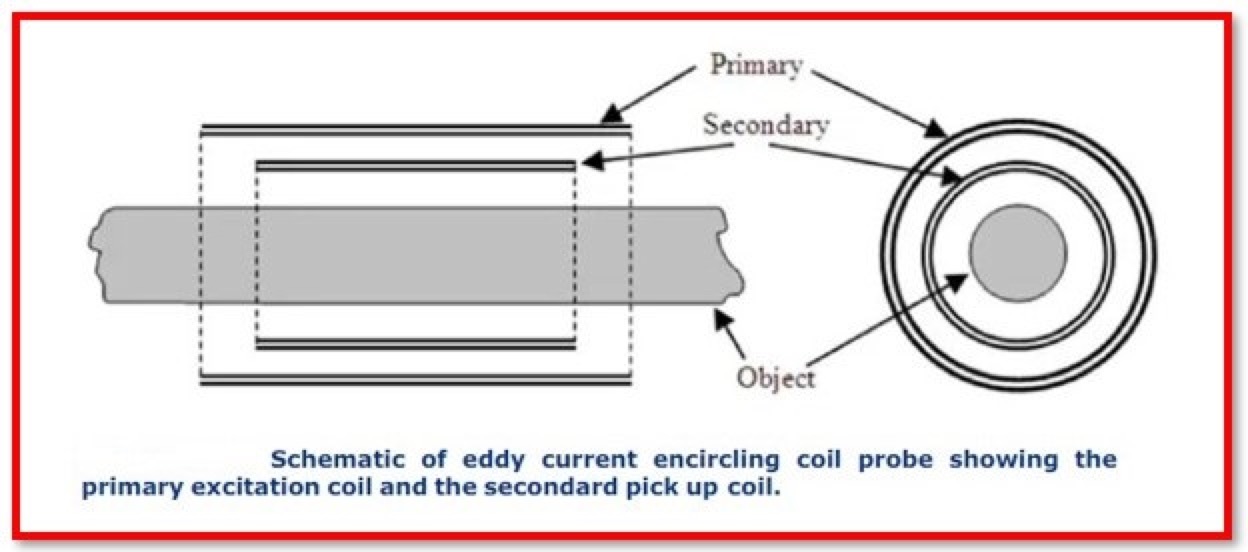
Some regularly used ECT probes are mentioned below, along with an overview of the defect types they address and the objects that they are often used to check.
Surface probes: Surface probes are used to find faults on and under metal surfaces. They typically have a wide diameter to support lower frequencies for deeper penetration (or) scanning bigger regions.
Pencil probes: It is a smaller diameter probes with high-frequency coils for high resolution of near-surface defects.
Bolt hole probes: These probes are designed to investigate the interior of a bolt hole and may be spun manually (or) automatically using a rotary scanner.
Donut probes: These are used to check aircraft fastening holes while the fasteners are still in place.
Sliding probes: Sliding probes, which are also used to examine aviation fastener holes, provide faster scan rates than the donut probes.
ID probes: Available in a range of sizes, internal diameter (ID) probes are used to check heat exchangers & similar metal tubes from the inside.
OD probes: Used for exterior examination of metal tubes and bars, with the test object pass through the coil.
Which Probe types are used for Tubing & Surface Inspection?
Tubing and surface inspections may be performed using a variety of probe types, from the simple single-coil probes to the array probes with more than 50 coils. The coil configurations that are utilised depend on the anticipated damage processes & the geometry of the test specimen.
Advantages of Eddy Current Testing
Capable of identifying fissures as narrow as 0.5 mm on or near a surface.
Insensitive to planar faults, this method may identify flaws across many layers of material, including non-conductive surface coatings.
Inspecting surfaces at high temperatures and under water are feasible with this non-contact technique.
The test materials physical complexity doesn’t affect its performance.
Capable of determining an object’s electrical conductivity.
Wheels, boiler tubes, and aero engine discs are all examples of items that might benefit from automated inspection.
Gives the results in real time.
Equipment that is easily transported and weighs little.
Reduced time spent on preparation since neither couplant nor extensive surface cleaning is necessary.
Disadvantages of Eddy Current Testing
Only works on with a conducting material.
Penetration depth varies from case to case.
Extremely sensitive to variations in magnetic permeability, which makes evaluating welds in the ferromagnetic materials difficult but not impossible with the use of cutting-edge digital fault detectors and probe designs.
Not sensitive enough to spot flaws that run perpendicular to the surface being tested.
Differentiating between useful and useless signals requires careful signal interpretation.
Applications of Eddy Current Testing
Inspection of parts (or) components, such as:
Welded connections
Tube bores in service
Bolt hole boreholes
Tubes made of metal
Welds with friction stir
turbine blades for gas turbines
Nuclear reactor nozzle welds
Hubs for hurricane propellers
Bridges made of wrought iron
turbine blades for gas turbines
Defect detection includes:
Defects on the cutting edge of technology
Linear flaws (up to 0.5mm deep & 5mm long)
Cracks
The absence of fusion
Corrosion in general (especially in the aviation sector for the evaluation of aircraft skins)
Additional applications
Identification of ferrous and nonferrous metals, as well as some alloys, particularly aluminium alloys
Setting up the heat treatment conditions
determining the non-conductivity of a coating
Metal heat treatment verification
Statement: Respect the original, good articles worth sharing, if there is infringement please contact delete.
As an electrical engineer with 5 years of experience, I focus on transformer and circuit breaker reliability in 110/33-11kV and 33/11kV substations. I am a professional electrical engineer with experience in transformer service and maintenance.
